Thanks for checkin' out Bsombin'! Over the years, I've met a lot of amazing people and made some good friends through Instagram. From the models and photographers that I have collaborated with to the entrepreneurs and businesses that have hired me, Instagram has helped me to connect to a lot of people who I probably wouldn't have met otherwise.
A few years ago I started following a photographer from Arkansa named Luke, after he followed me. Luke would share his favorite accounts with his followers, on his IG story. One of the accounts that he shares on his story belonged to a guy named Aaron. I think Aaron was living in Colorado at the time. But, Aaron and I also started following one another, thanks to Luke. After following him for a bit, I noticed Aaron was shooting in LA and around California. Mean while, Luke decided to take some time off of Instagram and went missing in action.
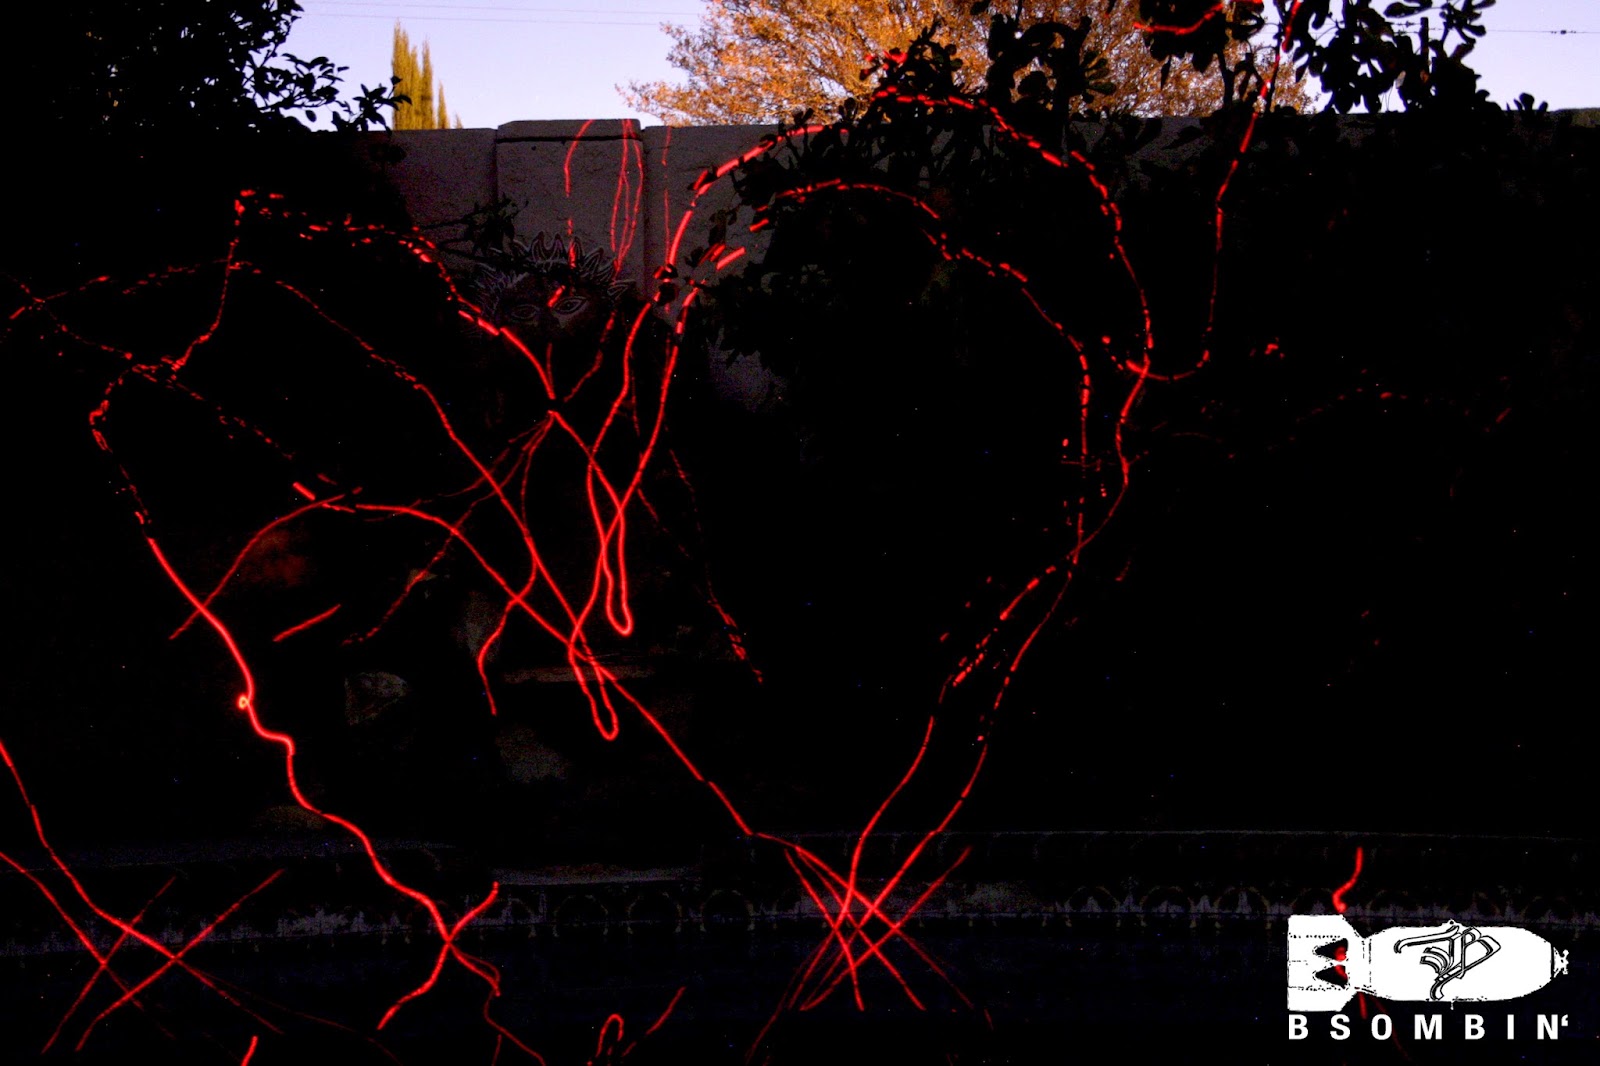
It had been a while since I had heard from Luke. But last week I got a message from him asking if I was still in LA and if I wanted to meet up with him and Aaron to shoot? He said they were going shooting the next day and then he was leaving back to Arkansa the following day. Fortunately, I was able to meet up with them. I had some stuff to take care of during the day. But I was able to meet up with them at night. I had asked them what they wanted to shoot, so I could plan a little tour for them. When I gave him some options, Luke was quick to answer rooftops and steel wool. So I wanted to take them on a tour of a couple of easy to access rooftops before heading into the LA river to spin wool. We started with a helipad on an rooftop close to the 110 freeway. We had good luck there. We all got shots we were really happy with and were able to get in and out without any problems. After that, I took them to another helipad on a rooftop that's just outside of Skid Row. That spot was a little more challenging due to a gate that had just been installed around the helipad. But we managed to get on the helipad and get some cool pics anyways. The next (and final) stop on the tour was the LA river. I wanted to take them to a spot on the train tracks where I had shot at about a year ago. The thing to keep in mind when showing people around downtown, though, is that things are always changing and they change pretty fast. So, the spot I took them to was gated off and we couldn't get in. I can be very persistent, when I make up my mind to do something, however. And I wasn't about to let Luke and Aaron go home without some steel wool shoots. So I started looking for another way in and was able to get us onto the train tracks after a walk around the block. The next problem we encountered were the newly installed flood lights that made the spot too bright for steel wool shots. I suggested going down into the river, to get out of the light, and shooting by the water so we could get a little bit of a reflection off the water's surface. We found a good spot and were able to shoot for a little bit before we got chased out of the river by some guy with a flashlight. Still, it was a successful mission. We got out safe and everyone got at least a few good steel wool shots before we had to call it a wrap. By the time we got back to the cars, it was a little past midnight. Luke and Aaron had a long drive back to Aaron's, and I had to be up early the next day, so we called it a night. After saying goodbye to the guys, I headed home to go through my pics. Not sure when I will see Luke again, since he's back in Arkansa. But, now that I know Aaron lives out here in Cali, we'll be shooting again soon. I didn't shoot a lot, that night, since I had already been to all of those spots several times. But I still managed to get some pictures worth sharing...
I feel very fortunate to have had all the great experiences and to have met all the amazing people that I have found through Instagram. I think it's important that we try to use our social media to connect with others in order to help one another grow and build. But I also want to remind everyone to be very careful when meeting people that you've met online. Not all the people who I've met have been as cool as Luke and Aaron. But that's another story for another time... I hope you enjoyed the pics, Thanks for checkin' out the blog. Please check back soon for more Bsombin'!
I am a visual artist from Southern California. And these are my stories, told with the help of my art, photography, & poetry.
Showing posts with label Light painting. Show all posts
Tuesday, May 28, 2019
Wednesday, January 23, 2019
Testing Ideas
Thanks for checkin' out the blog! Long exposure photography is my favorite! I instantly fell in love with it the first time I saw a picture with light trails in it. It fascinated me. I couldn't get over how strange it was that light left trails that we couldn't see with out eyes. I wanted to learn how to take picture with light trails for a long time, after that. Which is why, light trails were one of the first things I started shooting, when I got into photography. I started experimenting with long exposure photography learning to take my own light trail shots. Soon I was learning how to spin orbs and spin steel wool. I even learned how to make my own light brushes and spinning tools. It was just recently, though, that I started exploring the possibilities of combining long expose photography with time lapse photography. I have some ideas that I am developing for a time lapse project I want to shoot. But I'm still in the process of working out how to project the visions I see with the resources I have. The goal is to create a unique time lapse video that employs a variety of long exposure tricks to give extraordinary new life to something ordinary. I wanted to test out some ideas. To see how some of my theories play out in reality, I made a short light painting time lapse test. I'm using it as a base for the development of my project. I wanted to share some of the edited pictures that came out of the time lapse. I also stacked some of the edited pictures and made some light painting graffiti composites to share...
I'll be posting more of the project, as I develop my ideas, since I feel I have a long way to go on this one. I'm planning on shooting more tests and will probably make a tutorial video out of at least one of the tests. So please check back soon from more Bsombin' art, photography, poetry, videos, and more!
Monday, May 30, 2016
Slow Exposure Spins - Pt.3 (...finally!!)
Hello world! I'm finally back. ...I'm not even going to get into all the reasons (excuses) why this has taken so long to get around to. Instead, I'm just going to get right to it... So, how do you spin an orb?
In my blogging hiatus, I found that there are actually several ways of creating an orb effect when light painting. I'm just going to cover the basics here, to get you started. But, once you understand the basic idea, you can get creative and find other ways to create the effect.
The first thing you are going to need is a light source. There are a lot of different options, but your best bet is some sort of LED light, ball, or stick that you can attach to a rope, string, chain, wire, etc. In the future (hopefully not the distant future) I'll post some D.I.Y. ways to make light brushes and light painting tools. But, for now, I'll keep it real basic. I got everything I used to spin the orb shown above at the 99 cent store...
I just got a cheap little flashing LED stick and tied it to a 3' length of nylon rope. The LED bike light is what I used as my target. if you look at the image of the orb, you will notice that I have the LED bike light sitting under the center of the orb and I did this to help illustrate my point...
As far as camera gear goes... As with all long exposure photography, you'll need a tripod (or something solid and sturdy to position your camera on) to shoot orbs. Your settings will all depend on your environment and the type of light you are spinning with. I'm shooting with an old Canon 40D. So I usually keep my settings at a 15 - 20 second exposure, with my ISO around 600 - 1000 and my aperture around 4 - 8. But it's hard to say what will work best with the environment and LED variables. So my best advice is to just experiment and play with your settings till you get the color and intensity you want out of your LEDs.
The main idea behind spinning an orb is that you need to spin multiple circles while moving around a central axis that all the circles connect at. It's almost like winding a piece of string around a ball. The best way that I have found to do this is by standing on the edge of an imaginary circle on the ground and spinning the LED light over the center of the circle as you walk around the edge of the circle. I drew a not so beautiful illustration of the process, to help clarify what I mean.
What you have in the illustration are 2 views of the path you need to follow in order to create the orb effect with just 4 spins. The view on the left is a head on view and the smaller one on the right is an overhead view. I used different colors to represent the 4 angles that you need to spin the LEDs in. The numbers, with the corresponding colors on them, indicate where around the circles edge you need to stand as you spin. The number sequence is to show the different points along the path that you need to stop at as you move around the circle.
So, basically, what I do, as I spin, is take a step to the left after every spin until I have moved all the way around my center point and I try to keep the LED spinning in a vertical path. If you let the LED spin in a slightly horizontal path, the circles won't meet at the axis. The crooked paths take away from the orb effect and make orbs look sloppy. You can see in the example I used above that the orb has some crooked lines in the middle that almost look like the letter V, and that the last spin pulled far away from the axis point. Too much of this will turn your obr into a blob. Which is why I came up with the idea of having a target light to help me practice spinning. What you do is spin your LED and try to make sure it crosses directly over your target on every spin, as you step around the circle.
As soon as I can get my little ninja to help me, I will make some video tutorials on how to spin the different types of orbs that I have learned to create. Then you can see how silly I look in the process. Lol. If your orbs don't look like an orb, when you start trying to spin orbs, don't get discouraged! It takes some practice to get control and a good understanding of how to step while spinning the LEDs, before you'll get a perfect orb. But it really isn't about spinning the perfect orb as much as it is about having fun and being creative. So just have fun and experiment. Who knows... you might even stumble across a new way to spin an orb or a new type of orb all together!
I'll be posting a lot of the light painting that I did over the past year, soon, and will continue to teach what I have learned, here on this blog. So, check back for more Bsombin', and more light painting and long exposure photography.
Thursday, June 11, 2015
Slow Exposure Spins - Pt.2
Thanks for checkin' out my blog. If you've been waiting for this next part of the slow exposure spinning "tutorial", I apologize for the long wait! The work load has been heavy and there hasn't been much time for sleep (let alone blogging). But I didn't want to hold things up any more than I already have. Lol. Before I get into my explanation of how to spin wool, here's my disclaimer...
First, I am not a professional pyrotechnic! I don't even know if you could call me a professional photographer! Lol. I am not claiming to be any type of authority on anything either. I just like taking pictures, have learned a good amount about spinning through research and practice, and want to share what I have learned with anyone else that might be interested in learning how to capture slow exposure images.
Second, spinning steel wool is dangerous!! When you spin, you take the risk of burning yourself and/or anything/anyone that is around you. Hopefully, no one is thinking about doing this anywhere near flammable gases; liquids; or materials of any kind. If the thought had crossed your mind, DON'T!! The shower of sparks can easily set fire to things or cause serious injuries when it shoots everywhere. So if you are going to try spinning, stand at least 50 ft. away from anything or anyone that you don't want to shower with red hot balls of burning steel wool. ...Maybe 100 ft., just to be safe. The burning wool balls go far and burn red hot. They can go right through fabric and cause some bad burns, if they land on you. I know because I learned the hard way just how fast the red hot steel wool projectiles can burn through clothes and singe skin. So make sure to always spin outdoors and stay away from dry vegetation, brush, fabrics, etc.
So here's what you'll need...
1. A camera that has a long exposure option, to shoot with. Some compact/point-n-shoot cameras & most SLR cameras have this option available. Or you could try finding a long exposure app to download for your smart phones.
2. A tripod or something that can substitute as one. ...Anything sold that you can set the camera or smart phone on top of to keep it perfectly still during the exposure time.
3. A cooking wisk or something similar that will hold the mass of wool while still allowing the small bits to tear off and spin into a shower of flames.
4. A rope or chain to tie to the wisk. I suggest making it about 3 ft long. The longer it is, the harder it will be to start spinning and to control once in motion. Plus it will increase the range of the spark shower and give you even less control of things. You don't want things getting out of control, when flaming fire balls are involved!! But I wouldn't make it too short either. Then your fiery donuts will look more like sparkling donut holes. Also, be careful how you attache the rope/chain to the wisk, to avoid having the wisk come loose and fly off while you are spinning.
5. Steel wool. There are different counts on wool and not all wool burns the same. Some burns faster and hotter than others. So depending on what you are trying to get out of your spinning shots, you might want to try different kinds.
6. A lighter. Not matches, since you will need to be able to start swinging the wisk as soon as you get the wool lit. You'll need at least one hand free, in order to get things going. So matches are out of the question. You don't want to have another person light the wool either, since you won't be able to wait too long for them to get to a safe distance before you start spinning. If you wait too long, the wool will go out.
7. A partner to click the shutters. ...Unless your camera has a timer or remote control. But spinning is safer and more fun if you have someone to shoot with.
Below is a picture of the wool, wisk, rope, & lighter that my daughter and I used on our little wool shoot. I actually found everything at the 99 Cent Store and was able to save some time and money verses going to a couple of stores and paying 2-3 times more.
Now you know what you need. Once you have all your supplies and tools ready, the spinner will start by loosening up a roll of steel wool to make it easier to light. Just place the wool into the center of the wisk, the way I have shown in the picture. Once you get the wool lit and starting to burn, begin to slowly spin the rope at a short length and gradually let the length increase with each spin. Remember that the harder and faster you spin, more wool will burn; the sparks will fly farther; and the wool will burn hotter. This mean it becomes more dangerous and you won't be able to do as much in the shorter burn time.
While the spinner is starting to spin, the shooter will hit the shutter buttons on the camera or cameras. The best settings for a spin will vary, depending on the camera you are using; the amount of environmental light surrounding the spinner; the type of wool being spun; & amount of time you want to spin. I shoot with a few different Canon cameras. I usually keep my exposure time between 10-15 sec, the ISO around 600 for shorter times & around 400 for longer exposures. I like to experiment with the aperture, but I don't stray too far from around f/8.
As you can see in the picture above, it's best to have a lot of wool, when you go to spin. Especially on your first spinning adventure. You will need to get at least a couple of test spins in to figure out your settings. And the wool goes fast, once you start. It wasn't hard for me to go through a whole pack of wool on one shoot. So I suggest taking, at least, a pack or two.
Below is one more spinning shot, from that last father-daughter photo session. I used the supplies I have shown above, had my daughter's Canon XTi on a tripod, and had the settings at 15sec, ISO600, & f/8. I did edited the picture in Photoshop, to add a little saturation. But the edits were minor...
The last post will come a lot sooner than this one did. That's when I'll explain how to make a light orb. But, for now, I need to get back to work. ...Check back soon for more light painting and Bsombin'!
Friday, April 24, 2015
Slow Exposure Spins - Pt.1
What up world?! Thanks for checkin' out my blog! In a previous post I mentioned that I was going to be sharing some pics that my daughter and I shot over her Spring break. Also, I said I would explain how we created the images we captured. So here is the first part of that light painting post I was talkin' about...
I decided to put the "ends" before the "means", on this post, to show what it is I'm talkin' about, before I start explaining what we did to get the pictures. Below are some of the better shots we got out of the couple dozen attempts we made. It's 2 steel wool spins and 2 light stick orbs. In the next post, I'll show you what we did, for those looking to capture some spins and orbs of your own. Check back soon for the second part of Slow Exposure Spins and for more Bsombin'!
Tuesday, April 7, 2015
Writing with light
Thanks for stoppin' by to check out my blog! As an artist, I am always looking for new ways to create and express myself. For this reason, I love to explore the infinite possibilities presented by mixing different artist's mediums. I also try to incorporate different media, like photo and video, into my work when ever I can. So it occurred to me to try mixing my calligraphy art with slow/long exposure photography to create some glowing letters! My assistant had to go to bed, since it was a school night. So, I had to move quick and think fast, being both the shooter and the light painter. These "B's" are from the first night's batch of illuminated handstyles. It took a few fails before figuring it out, and I still need a lot more practice, but these are the 2 best shots out of about 20 attempts. I had the shutter open for 25sec., to give me enough time to click the shutter, run in front to the camera, & write. And, my ISO was at 400 with the F at 4, in case anyone is wondering. I think the letters would have come out better if I would have had someone to click the shutter for me. But, considering I was solo, I think they came out good enough to share. My assistant was on Spring break this past week, so we managed to find a little time for a father-daughter-light-painting session in which I introduced her to steel wool. I also learned how to spin an orb! So I will be posting those pics soon, and will tell you how I created them, so don't forget to check back soon for more Bsombin'!
Monday, March 30, 2015
My poetic depth
"Implosion"
Frozen desert &
Arctic oasis
...they found my
Sediment in sentiment's aftermath,
Before beginning to
Implement their icy ways on my
Blackened fragments
Their's was a forced assimilation,
Brought by void's embrace,
Which demanded I be force fed insecurities
By rejection's tundra and
Solitudes abyss
As arteries turned to winter streams,
During the decomposition of my corner stone,
The absence of sunshine invaded my tomorrows and besieged my fortified
Bliss;
Sympathy forced her gravity to invert it's pull and crystallized into a toxic
Shrapnel embedded in my sense of self and subconscious; &
My failure's echos set off the avalanche that buried my will to continue
Then, just as
My moon began to sink into bitterness' black ice,
The last drop of
Sunshine that my heart had left inside
Dripped over my third eye...
Suddenly, this abomination imploded,
Forgetting my regrets and lamentations, as
Selflessness replaced the frozen eyes I was blinded by &
Mended the wounds that had been inflicted by greed and gluten,
Then compassion and empathy grew out of depression and apathy...
The black ice was replaced by red magma & the bitter wrath transformed to
Sweet affection
...Once broken and cold,
Now solid & fiery...
Never again will heart ache's frost settle on my
Summery soul, now that it burns full of love's wisdom & understanding!
- Bsomb4
Thursday, March 19, 2015
Pool-cuzzi light painting session
Thanks for checkin' out my blog! For those who don't know, I am a dad. ...a very fortunate one who's daughter is everything a parent could ask for and more! We have much in common and share a lot of interest, including photography. Light painting is something that we've learned together, over the years, and she's helped me on a lot of the projects that I've worked on. Which is why I decided to share some shots she got of me playing with a laser and a flashing light stick. I put the "pool-cuzzi" between myself and the camera, to add a reflection to the images, and set the shutter for 8 - 10 second exposures. The kid wanted to use the auto focus, though, so we had to try several times for each shot. Despite the repetition and fails, though, we had a good time, laughed a lot, and both learned more about the art of slow/long exposure light painting. Here are some of the successes we had that night. Check back soon for more pool-cuzzi light painting & more Bsombin'!
Tuesday, February 17, 2015
Purple Rain
So, what I did was take some slow exposure shots of yours truly spinning steel wool (..the homie Jefroe hit the trigger after I set up my camera and started spinning). Then, I took the images into photoshop and adjusted the exposure, saturation, and hue, to take golden rings of fire and turn them into Purple Rain 1&2.
Subscribe to:
Posts (Atom)